How to Flush DNS
The process for flushing DNS varies depending on your computer’s
operating system. Let’s go over the process for the major systems
below.
How to Flush DNS Windows 10
Here’s the processing for flushing your DNS cache on Windows 10.
These steps should also work for Windows 8.1
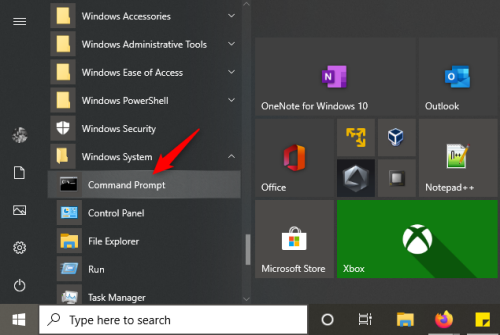
1. Click the Start button.
It’s the Windows logo in the bottom left corner.
2. Select Command
Prompt.
3. To open the command prompt console, you could also
simply press the Windows and R keys
at the same time and enter cmd.
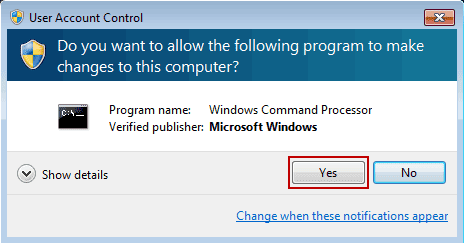
4. You may see a popup asking if you want to allow Command
Prompt to make changes to your computer. If you do, select Yes.
5. If you are asked for an administrative login at this
point, then you’ll need to contact your system administrator to
proceed.
6. In the command prompt window, type ipconfig
/flushdns.
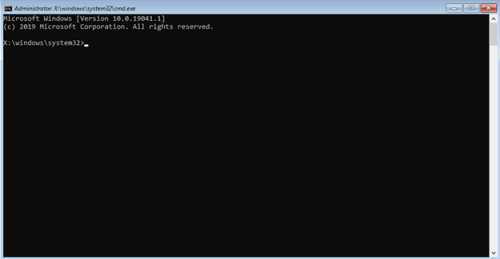
7. Press Enter.
8. You should see a message confirming that the DNS
Resolver Cache was successfully flushed.
How to Flush DNS Windows 7
The process for flushing your DNS cache on Window 7 is nearly
identical to that of later versions.
1. Click the Start button.
It’s the Windows logo in the bottom left corner.
2. Click All
Programs > Accessories.
3. Find Command
Prompt. Right-click it, and choose Run
as administrator.

4. You may see a popup asking if you want to allow Command
Prompt to make changes to your computer. If you do, select Yes.
5. If you are asked for an administrative login at this
point, then you’ll need to contact your system administrator to
proceed.
6. In the command prompt window, type ipconfig
/flushdns.
7. Press Enter.
8. You should see a message confirming that the DNS
Resolver Cache was successfully flushed.
How to Flush DNS Windows XP and Vista
The process for flushing your DNS cache on Windows XP and Vista is
nearly identical to that of Windows 7. However, the message at the
end varies and may require admin intervention.
1. Click the Start button.
It’s the Windows logo in the bottom left corner.
2. Click All
Programs > Accessories.
3. Select Command
Prompt.
4. In the command prompt window, type ipconfig
/flushdns.
5. Press Enter.
6. You should see a message confirming that the DNS
Resolver Cache was successfully flushed. If you receive a message
that says “Action Requires Elevation” instead, then you need to
contact the admin of your computer to complete the steps above.
How to Flush DNS Mac OS X
The process for flushing your DNS cache on a Mac computer is
similar, no matter what software version it’s running. But you will
need to know what version for step 6 since the command prompt
varies.
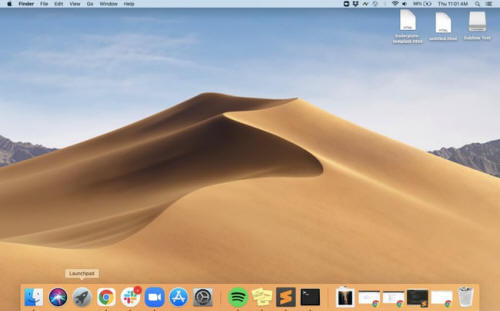
1. Open Finder.
2. Click Applications.
3. Scroll down to the Utilities folder
and click it.
4. Open Terminal.
5. To open Terminal, you could also simply open Launchpad and
type in “Terminal” in the search bar.
6. In the Terminal window, type in the one of the following
commands based on your software version:
-
10.7-10.9, 10.11-10.14 (Lion, Mountain Lion, Mavericks, El
Capitan, Sierra, High Sierra, Mojave): sudo
killall -HUP mDNSResponder
-
10.10 (Yosemite): sudo
discoveryutil mdnsflushcache.
-
10.5-10.6 (Leopard, Snow Leopard): sudo
dscacheutil -flushcache
-
10.4 (Tiger): lookupd
-flushcache
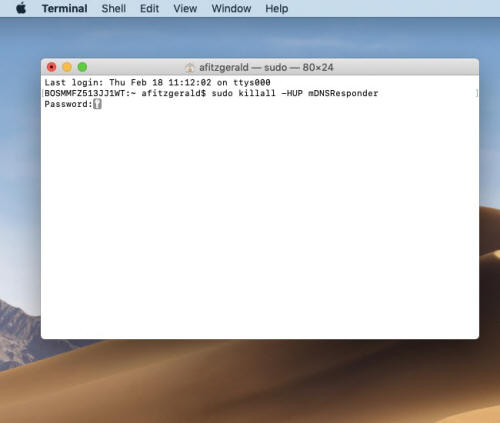
7. Enter your password and press Enter again.
8. You should see a message confirming that the DNS cache
has been reset.
Note: The screenshots in this section are my own.
How to Flush DNS Google Chrome
Google Chrome is not an operating system of course, but it does keep
a DNS cache of its own. This is separate from your operating
system’s cache and from Chrome’s browser
cache. If Chrome is set as your default web browser, then you’ll
need to clear Chrome’s DNS cache as well as your operating system’s
DNS cache. Here’s the process.
1. Type in the following address into your browser’s
address bar: chrome://net-internals/#dns
2. Click the Clear
host cache button.
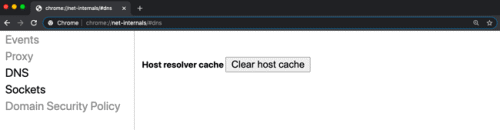
Note: The screenshot in this section is my own.
How to Flush DNS Linux
Unlike Windows and Mac computers, Linux systems don’t have a DNS
cache by default. However, each distribution might use a different
DNS service to store DNS records locally. Depending on the service,
you can either clear the cache or restart the service.
1. Press Ctrl+Alt+T on
your keyboard to launch a terminal window.

2. In the Terminal window, type in the one of the following
commands based on the service your Linux system is running.
-
NCSD: sudo
/etc/init.d/nscd restart
-
Dnsmasq: sudo
/etc/init.d/dnsmasq restart
-
BIND: You may have to try multiple commands:
-
sudo /etc/init.d/named restart
-
sudo rndc restart
-
sudo rndc exec
3. You may be asked to enter your password.
4. The service might stop, then start again before sending
a confirmation message that the cache was successfully reset.
Flushing Your DNS Cache
There’s a lot of reasons to regularly flush your DNS cache. It can
help prevent phishing schemes or other attacks on your computer,
direct you to the most up-to-date versions of your most frequently
visited sites, restore your internet connection, and keep your data
private.
The best part is how easy the process is. Following the steps above
can help you perform a DNS flush quickly and easily, no matter what
operating system your computer has. That way, you can move onto your
other website
development tasks. |